Gardening Zeal

All About Gardening

  • Home
  • Gardening Guide
    • Growing Fruits
    • Growing Vegetables
    • Lawn Care
    • Plants and Flowers
  • Indoor Gardening
    • Houseplant Types
    • Indoor Plants FAQs

Can Cats Eat Spider Plants – Proven Ways to Stop Cats!

By Sarwat Rehman

If you are a kid from the 1970s era and a Disney fan, you must also remember the iconic movie ‘The Aristocats.’ The movie was based on a true story with a Parisian family of cats.

We can’t stress over how adorable cats can be as pets, but everything on this planet is bound to come with pros and cons.

Although cats can make a great addition to your family, pet owners often worry about the common myths going around the town.

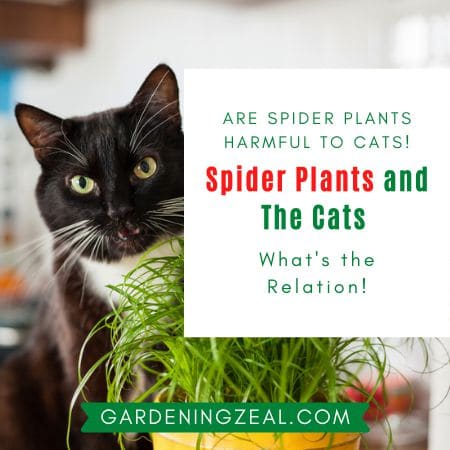
One of the common myths to be busted is the talk of ‘Can cats eat spider plants’ or ‘Can spider plants be toxic to my cat?’.

Relationship Between Your Cats and Spider Plants / Why Are Cats Drawn to Spider Plants?

Firstly, let’s understand what a spider plant is?

Spider Plants (Chlorophytum comosum) is an African plant from the asparagus family of plants. These specific plants are also commonly referred to as ornamental houseplants, easy to manage as well.

Can Cats Eat Spider Plants
Can Cats Eat Spider Plants?

Now the question arises, why do our cats usually find themselves drawn to spider plants?

As cats are obligate carnivores, they need a high amount of proteins in their diet. Their food should be chosen with the type and age of the cat.

For instance, kittens should be kept on a high caloric diet, and senior cats should be kept cool on the carbs. It really varies on their interest. In a home that has spider plants with a cat, you must witness your cats eating the leaves of the same plants.

We Can Look at it From Two Angles-

● Some people believe cats are drawn to spider plants because they generate opium-like chemicals that supposedly give a sense of fascination compared to catnips. It is believed that the feeling of fascination demands them to eat more and more. These plants can be defined as hallucinogenic as they can cause mild hallucinations in your cat’s mind.

● While some people believe that spider plants have a fragrance that can make your cat faint if they smell it. Many pet owners won’t even notice it because it is not detectable by the human senses.

While exploring different pet advices on cats, they say cats are not attracted by the fragrance but by any object which seems to sway or hang from a distance.

Are Spider Plants Harmful to Cats?

We can’t say anything specific to the above theories because it is feasible to believe in. You can only tell facts if you have come across such incidents; many owners avoid it thinking their cats are just playing with the plant out of boredom.

When your cats are found near spider plants more often than usual, it is time you observe them. According to the ASPCA (American Society for the Prevention and Cruelty of Animals), spider plants are not poisonous to cats or other pets.

Furthermore, it is suggested to keep your cats away from such plants because if consumed in large portions, it can cause a toll on your cat’s health.

Even though spider plants are hallucinogenic in nature, if cats are not stopped from consuming them, they can create a habit of it.

Therefore, it has been observed if cats develop a habit of eating spider plants, it can be extremely difficult to deal with them. You may even need a veterinarian to take care of your cat.

Can Your Cats Get Addicted to Spider Plants?

It is true that spider plants are mildly hallucinogenic in nature, but whether your cats will get addicted to it or not, we can’t predict anything. In addition to it, there’s a difference between getting addicted to something and developing a habit of something.

In this type of case, you must take care of your cats because habits can be removed after a particular time, but addiction can’t.

When you introduce something new to your cats in order to break this habit from spider plants can be stressful for them. And, to see your cat suffering can be daunting as a pet owner. To avoid all this prior happening to your cat you can seek some pet advice to prevent any future incidents.

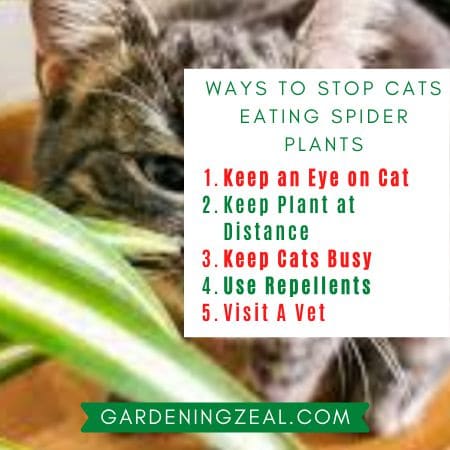
Ways to Stop Your Cat From Eating Spider Plants

Can Cats Eat Spider Plants
Ways to Stop Cats from Eating Spider Plants

With time if your cat is developing a habit of eating spider plants, there are steps you can take to take to stop them-

● Keep Your Cats in Front of Your Sight- Don’t let your cat go away from your site. You can always choose to caress them or play with them, with all your love they won’t think about the spider plants.

● Keep Your Spider Plants at a Distance-

If you can’t keep your cats away from the spider plants, put the spider plants away. Either keep your plants in a separate room where your cat doesn’t roam around or in hanging baskets as decor.

● Grow Plants Your Cats Can Find Their Fond in If you are a pet owner of a cat who enjoys eating nips and leaves from plants. You can always grow some that might captivate them and won’t be harmful. There are a plethora of seeds from catnips and cat grass available in the market for you to grow them at your home.

● Keep Your Cats Busy- Again, don’t let your cats get bored and eat spider plants out of boredom. Give your cats a routine of you playing with them daily or objects which they can play with. Wool Balls, Plush toys are great options to look out for.

● Spray Your Spider Plants With Bitter Tasting Repellent- If you play with them or keep your plants away from your cats, it isn’t helping. The last option is to spray the spider plant’s leaves with a bitter-tasting repellent. This can prevent your cats from tasting the plant ever because of that bitter bud encounter.

Seek Professional Help

There can be two scenarios where you might have to get professionals to do their job.

1. Sometimes, owners detect the weird behavior of their cats and get confused about what to do. In this case, you should seek pet advice from professionals instead of calling a vet.

2. If your cat has consumed huge amounts of spider plants, it can cause vomiting, upset stomach, etc. In this case, you should call a vet because of their profession. Vets can advise you on the better condition of the cat and not on their behavior.

Conclusion – Can Cats Eat Spider Plants

Usually, while buying a cat or any pet, many owners think, ‘Oh, they are adorable and easy to manage, let’s have one. In addition to that, when exploring pets, the owners are often not cognizant of such myths connected to them. It is essential that we make ourselves fully aware of the pet we will own and take care of them till their last breath.

In general, our purchase decisions of a pet are always on the back of your mind. This is because you have seen or interacted with one a couple of times.

However, there’s a difference between interacting with pets externally and taking responsibility for them for life.

To make yourself fully aware of pets and the mysteries connected with them. You can definitely opt for some pet advice from the right resources.

Many organizations offer detailed pet advice where you will know all about pets straight from their breed, habits, health background and what is good for them and what’s not, etc.

For more information, you can talk to your friend who has a pet, and alternatives are not a bad option after all.

White Spots on Tomato Leaves – 7 Main Reasons + Treatment Plan

By Sarwat Rehman

Seeing white spots on tomato leaves can be concerning for any gardener who has spent months growing the plant, waiting to harvest those beautiful red tomatoes- but what causes these patches?

White spots on leaves are caused by several reasons, including sunburn, insect bite, frostbite, nutritional deficiencies, mold growth, and a fungal disease called powdery mildew. All of these negatively affect the health of your plant and need a prompt treatment course.

Most plant issues can be cured by addressing the root cause and preventing further damage. In this article, we’ll discuss all these problems and their treatments, so your plant remains healthy and grows gorgeous plump tomatoes.

Main Reasons of White Spots on Tomato Leaves – Treatment

white spots on tomato leaves
Tomato Plant Problems

1.      Sunscald

Sunscald or sunburn is a common occurrence when plants are exposed to harsh sunlight for extended periods. Tomato, or any other vegetable leaves, can get sunburnt fast if planted directly under the sun. It’s a mistake a lot of beginner gardeners make- even though tomato plants thrive in the sun, more sunlight is not always necessarily better.

Sunburnt leaves often have white slivers in their center but can appear as patches. It’s more common in young plants and seedlings.

Leaves also look scrunched up when they’re sunburnt, so if you notice an abundance of white and faint green with a wilted-looking leaf, sunlight is the likely culprit. Another way to diagnose a sunburnt plant is by looking at the tomatoes- they will likely have blisters and burns.

In addition to bright sunlight, sunburn can be caused by a sudden change in the plant’s location. Moving a plant usually kept indoors that gets filtered light under the intense sun for a prolonged period can also cause leaves to turn white.

How To Treat It:

Sunburns don’t go away, but they don’t affect healthy plants much. Tomato plants need about 6-9 hours of sunlight a day. Too little and fungus may grow, too much and sunburn may occur. To avoid sunburn blisters, install a shade that allows light to constantly filter through while direct exposure is available for a few hours daily.

If you’re introducing a plant to sunlight, make sure to do it gradually, so the plant has time to adjust instead of a radical change. Plants hate getting blasted by heat and light, no matter how important they are.

2.      Insect Bite

If you’ve found tiny white spots on tomato leaves that are scattered and look cloudy, it may be a stinkbug bite. Stinkbugs don’t attack the leaves only, though, and you will likely find similar spots on the fruit as well.

Other bugs like thrips, spider mites, and aphids might be causing these spots. However, they’re never as active as stinkbugs. Stinkbug bites can also be distinguished by their presence under the leaf and below the tomato’s skin.

How To Treat It:

Insect bites don’t spread, so your only focus should be keeping the bugs away. Instead of buying an insecticide, you can use something like Neem oil or dichotomous earth. A sharp mulch also keeps bugs at bay.

3.      Frostbite

On the other end of the spectrum of sun and heat damage is frostbite. If you live in a cold climate where temperatures can drop well below 5C (40F) in winters, unprotected plans exposed to the atmosphere can get frostbites quickly.

Thankfully, frostbites are never too detrimental to your plant’s health and can be easily spotted. Tomato leaves get frostbite near the vein, where they initially appear white but then turn tan or brown. White ice crystals line the leaves, and the stems appear sunken too. Younger plants are more vulnerable to cold.

white spots on tomato leaves
White Spots on Tomato Plant

How To Treat It:

Frostbite is cured by raising the temperature. You can do this by watering them (yes, it sounds counterintuitive, but it works), providing a covering at night, and using mulch. Also, a little tip is not to prune the plants until temperatures get warmer. That way, the new foliage and growth isn’t affected.

4.      Nutritional Deficiency

An important deciding factor for a plant’s health is the kind of soil and fertilizer you use. Fertilizers and mulches are crucial for a plant to remain healthy and grow those Instagram-worthy tomatoes.

Using a fertilizer that doesn’t fulfill a plant’s nutritional needs can cause its leaves and stem to show white and faint yellow spots. Patchy leaves may be a sign of deficiency of essential minerals like magnesium, potassium, calcium, nitrogen, and phosphorus.

How To Treat It:

Nutritional deficiency can be treated using compost or fertilizer with a balanced nutrient supply. Fertilizers with both nitrogen and phosphorus base are better. Magnesium deficiency can be addressed by using Epsom salt. Calcium can be added by powdered lime mixed with soil. A good source of potassium for your compost is kelp.

5.      Leaf Mold

If the white blotches on your tomato plant leaves are not due to weather, insects, or nutrition, then it’s likely a disease.

One of the most common diseases blighting tomato plants is the tomato leaf mold, caused by a fungus called Passalora fulva, which affects thousands of plants worldwide. It’s mostly present in greenhouses, though it can spread in any climate with high humidity.

Leaf mold can be observed as faint white-yellow patches when the mold is not at the sporulation stage. Once it starts spreading by spores fast, the white often turns brown. In severe cases, it can even affect the fruit. Hence it’s a disease that needs to be addressed quickly.

How To Treat It:

Leaf mold can be treated by pruning affected leaves and using a simple fungicide. Exposure to a good amount of air and sunlight can also treat the issue on its own.

6.      Powdery Mildew

Another cause of tomato plant white leaf spots is powdery mildew, another type of fungal disease. These are the most distinctive white spots that appear as round white blotches. If they persist for a long time, they leave dead tissue behind, turning leaves brown and causing them to wilt.

Powdery mildew is brought by wind and grows at accelerated speeds in high humidity and shady, moist environments. Plants that receive little to no air or sunlight can also be affected by mildew. Consistent mildew growth is facilitated by excessive use of fertilizer and overwatering.

Powdery mildew isn’t known to harm plants significantly, though, and your plant will most likely live. However, it can affect the flavor of tomatoes and significantly reduce your yield.

How To Treat It:

Powdery mildew has two steps to treatment. First is pruning- make sure to get all affected areas removed and properly sanitize your equipment. If more than half the leaves are affected, remove the most severe ones only so your plant can survive.

Second, use a sulfur spray to deter powdery mildew growth quickly. A good home remedy for white spots on tomato leaves caused by mildew is a milk spray- simply mix milk and water in a 2:3 ratio and spray it everywhere. Using Neem oil and vinegar also works.

7.      Late Blight

The last cause of white spots on tomato leaves is late blight. Late blight is also a fungal infection that starts as white spots but is actually a very severe disease. It spreads very fast and causes leaves to turn brown, shrivel up, and die. It also causes dark brown spots on tomatoes and spreads to nearby plants like wildfire.

How To Treat It:

If you spot late blight on tomato, immediately prune the affected parts and discard them. Any leaf or fruit affected will not recover. Do not use pruned parts in compost. Do not bring them in close vicinity to any plant, or late blight will also affect them. Sanitize your pruning tools thoroughly.

Once you’re done pruning, use a fungicide containing copper, maneb, mancozeb, or chlorothalonil. Do not water near the area affected by late blight. Use the fungicide once or twice a week on all plants.

Prevention of White Spots on Tomato Leaves

Now that we’ve addressed all the main reasons why white spots might appear on tomato leaves and their treatment, it’s time to discuss some general measures gardeners should take to avoid all of these issues.

1.      Proper Watering of Plants

Overwatering plants is a leading cause of plant death and promotes fungal growth. Water plants appropriately, depending on humidity and plant size. Don’t water the leaves directly, especially if you’ve dealt with fungus recently. Tomatoes need about 1 gallon (4.5 liters) of water per week.

white spots on tomato leaves
White Spots on Tomato Leaves

2.      Using Mulch

Mulch is essential for proper plant growth. It protects against fungus and pests, retains water, and provides beneficial nutrients. It’s also great for thermoregulation by the plant.

3.      Ensuring Air Circulation

Tomato plants must be 1.5-2 feet apart to ensure proper air circulation. Make sure the plant is not in a confined spot, and there’s not a lot of moisture nearby; otherwise, molds could take over.

4.      Pruning

Regularly pruning wilted parts of the plants can help your plant grow faster and healthier. You should also prune any parts that seem infected (yellow or white spots). Just don’t prune during winters, as your plant can’t grow new foliage when in survival mode.

5.      Rotating Crops

Crops need to be rotated every year or two, and tomatoes are no different. After two spring seasons, you should rotate your tomato crop to avoid weed growth and insecticide-resistant pests. Do not use seeds from infected plants either.

Conclusion – White Spots on Tomato Leaves

There are several reasons why white patches might appear on tomato plant leaves. However, they’re easy to identify and treat using simple measures, like shielding your plant from excessive sunlight, avoiding overwatering, and using quality mulch and fertilizer. Even if your plant is diseased because of fungus, you can save the crop by pruning and using fungicides.

As long as you tend to your plant regularly and notice symptoms like white spots on leaves early, you can protect your plant from damage and wilting.

Venus Fly Trap Turning Black: 6 Reasons [Top Solutions]

By Sarwat Rehman

Why is Venus fly trap turning black? Do they need extra care as compared to other houseplants? These are some most common queries of plant lovers.

Venus flytraps (Dionaea muscipula) are quite different from other house plants. They need extra care when it comes to their growth. Overfeeding and wrong weather conditions are the most common causes for a Venus flytrap turning black.

So, don’t let your plant die early and learn how to keep your plant healthy and green. The steps are pretty easy but will have a significant impact on the plant’s health.

Let’s get started with some basic knowledge about the plant.

Why is Venus Fly Trap Turning Black?

This insect-eating plant is not only attractive due to its unique properties but is also hard to maintain. Most people find it challenging to keep a Venus flytrap healthy.

venus flytrap turning black
Venus Flytrap Problems
  • One of the main reasons for a dying Venus plant could be its limited lifespan. On average, a plant dies after living 20 years.
  • However, the Venus traps only live for about 3 months and turn black after that. Healthy leaves replace the black leaves. If this happens, then there is nothing you should worry about.

But, if the traps are turning black without replacement and the plant is dying at an early stage, then there could be one of the following reasons:

Unsuitable Growth Conditions

Growth conditions for a Venus flytrap are different from other houseplants. Unlike most plants, it takes some nutrients from the soil and the remaining from eating insects. Most probably, you may be doing wrong such as:

The first mistake you might be making is planting Venus flytraps in the regular soil. They grow best in acidic soil and have minimum nutrients.

Another mistake you might be making is adding fertilizers to your flytrap plant. Venus flytraps are habitual of growing on their own. Being from the species of wild plants, they are habitual of fulfilling their nutrient requirements from the environment.

Therefore, adding fertilizers can be one of the reasons for your Venus flytrap turning black.

Venus flytrap is also sensitive when it comes to the water that you are using. Water containing excess levels of TDS is not a healthy choice for your flytrap plant. It can cause the leaves to turn black and shorten the plants’ life.

 As long as the TDS level is less than 50 ppm, there wouldn’t harm the plant. But usually, tap water contains a high level of total dissolved solids, negatively affecting the Venus flytrap.

Dormancy – Venus Fly Trap Turning Black

Like all the other plants, the Venus flytrap is also a seasonal plant. Some plants bloom in summers while others in autumn. Venus flytrap is not a winter-friendly plant.

You might notice that the traps on the plant start getting darker as the weather gets colder. This is the beginning of its dormancy period, which lasts for 4 months.

This period varies depending on the duration and harshness of the winter season in the area.

Indigestion

Sometimes the flytrap might eat an insect that is too big. When an insect gets inside, the trap mouth closes for digestion.

But if the prey size is greater than the trap, its legs stick outside, preventing it from closing. This causes indigestion, and as a result, its color starts to turn black.

venus flytrap turning black
Venus Flytrap Problems

Overfeeding

A Venus flytrap turning black can sometimes be a clear indication of overfeeding. It happens when you feed your plant by hand. Feeding each trap of the plant will require a lot of energy from the plant to digest the food.

This will eventually result in black leaves. Also, hand feeding your flytrap will result in excess nitrogen, which is not suitable for plants’ health.

Stress

Plants are also living beings and can get affected by the environment in which they are grown. Growing a Venus plant in a place with continuous movements can cause stress.

This results in the immediate death of the plant. If you frequently repot your plant, then it can result in “Repotting stress.”

Insufficient Lightening

Venus flytrap plant uses the sunlight to survive. The light from the sun is a source of energy it uses for digestion and other processes.

The ideal light requirement for a flytrap is 12 hours per day. Less intake of sunlight can cause the traps to turn black.

It might not die immediately but will start to weaken slowly. Leaf edges turning black are a clear sign of light deficiency.

 How to Save a Venus Fly Trap Turning Black

You can take specific measures to control your Venus flytrap turning black. Here are some solutions to ensure plant health:

  • Venus flytraps can be used to less nutrient soil. They cannot bear soil having minerals and nutrients. To keep your plant healthy and green, use peat moss or long-fiber peat moss.
  • The flytrap plant is wild and therefore doesn’t need added nutrients. Adding fertilizers can damage your houseplant instead of nurturing it. When it comes to the use of water, never use high TDS level water. To ensure the healthy growth of your flytrap, use distilled water in place of tap water.
  • Venus flytraps need an adequate amount of sunlight to perform various processes. Place the plant pot in direct sunlight. You can also use artificial lighting to provide the plant with suitable light conditions.
  • Place your flytrap plant in a place having minimum movements. Also, avoid frequently changing the plant location. After changing the place of your plant, allow it to settle in the new environment.
  • Cut the black leaves of your Venus flytrap plant. Removing the dead leaves from the plant will save the remaining plant from turning black.
venus flytrap turning black
Tips to Save Venus Flytrap

How to Remove the Dead Leaves from the Venus Flytrap?

 You should be extremely careful when removing a deadly trap from your Venus flytrap. Below are some essential steps you must follow to cut the dead leaves without damaging the plant:

Ensure to use a sharp knife or scissors to cut the death traps. Removing the trap with hands can pull out the roots, and the plant can die.

Cut the death trap at the closest point from the bulb. The closer it is to the bulb, the lesser is the stress on your flytrap. But do not damage the bulb while trimming your plant as it is susceptible.

Cut all the dead leaves at once so that the plant has to bear less stress. You should remove the traps that might be resisting the growth of healthy traps.

FAQs – Venus Fly Trap Turning Black

Why Should I Remove the Black leaves from the Venus Flytrap?

Black traps can cause strain in the plant, which affects its growth. This also causes the growth of bacteria and mold on the plant, which is bad for the plants’ health.

Why Are the Leaves of my Venus Fly Trap Turning Black after Getting Proper Care?

Venus flytraps die after living for a certain period. An average flytrap lives for about 20 years before dying.

Each trap on the plant lives for only 3 months approximately. After completing the lifespan, traps start turning black before the complete death of the plant. So, even if you provide the flytrap with all the right growth conditions, it will still die.

When to Cut the Black Leaves of my Flytrap?

The edges of a flytrap leaf start turning black before it dies completely. Black edges are a sign that the trap is still able to perform photosynthesis. Wait until the trap dies, and then you can remove it from the plant.

Can I Use Fertilizers to Improve The Health of my Venus Flytrap?

Using fertilizers is not recommended for them as it is the main reason for a Venus flytrap turning black. As a beginner, you should strictly avoid it. But when you gain some experience with its growth, you can use fertilizers in its growth period. You should only use weak fertilizers to improve the health of your plant.

What is the Difference Between a Black and Yellow Trap?

A black flytrap is harmless and completely normal. It is usually a part of some natural process. Yellow leaves are not harmful when limited in number. But if there is a regular pattern of traps turning yellow before dying, there could be some problems. Yellowing of the traps is usually due to a rotten root or improper growth conditions.

Kids Gardening Gloves: 9 Best Kids Gardening Gloves to Buy

By Sarwat Rehman

Kids gardening gloves are something kids brag in the garden to fell grown up. They also need protection to cut a vine, collect leaves, or simply water plants in the lawn with their parents or grandparents.

As thorns or other sharp objects remain unidentified and can hurt kids. So, working in gloves is the best way to keep little helpers gardening.

Hunting for an ideal pair of gardening gloves is quite difficult as countless gardening gloves have unlimited features.

So, after deep research and evaluation, I have listed the 9 best kids gardening gloves to make your purchase easy. You will find special features of all gloves, including comfort level, colors, designs, material, quality, size, and on and on. Furthermore, you will also get reasons to buy and avoid as per customer’s honest opinions.

In the end, there are factors to consider before buying gardening gloves. So, let’s buy the best!

Soft Safety Rubber Gloves for Kids Gardening

Give your kids next-level gardening comfort with these soft rubber gloves, perfect for girls and boys of age 3-5 years.

Special Features

  • Rubber material
  • 3 pairs – Green, purple and blue
  • Cartoon designed kids gardening gloves
  • Firm grip; No-slip
  • Machine washable
  • Quick dry
  • Elastic cuff

Buy on Amazon

Soft safety kids gardening gloves are highly flexible with a polyester liner and have foam latex palm for extra comfort. Kids can also cover their wrists with long elastic cuffs.

These gloves offer kids a perfect gardening experience, and their firm grip also keeps them safe from any gardening tool slip danger.

If your kids are multi-tasking and participate in digging, seeding, mowing, weeding, and picking, these soft safety rubber gloves are best for your children.

You don’t need to worry about sharp objects piercing kids’ fingers while digging anywhere.

These kids’ gardening gloves also prove beneficial in other outdoor activities like cycling, fishing, hiking, and playing. Even kids enjoy and feel safe with these gloves while camping and doing DIY works.

Cute cartoon designs on the gloves add special interest, and you can offer these gloves as a gardening gift to your kids.

A plus point of these rubber gloves is they are super easy to wash and dry. Mud or dust doesn’t leave everlasting stains.

Sizes available: (XXXS 3-5), (XXS 5-7), (XS 7-9)

Reasons to BuyReasons to Avoid
Good quality Not any!
Highly durable
Stretchy and flexible
CE certified
Bright colors that kids love


Kids Gardening Gripper Gloves

If your kids, grandkids, nephews, or nieces are of different ages, 3 to 13 years, these gripper kids gardening gloves are best for you.

Special Features

  • Polyester and latex
  • 2 pairs – Orange and yellow
  • 4 sizes available
  • Foam rubber-coated gloves
  • Knit wrist
  • Highly breathable
  • Firm grip

Buy on Amazon

Kids gardening gripper gloves are must-have garden gears to protect little hands. Polyester makes these gloves highly comfortable, and kids can easily play with the mud. Above all, natural latex foam keeps kids’ hands cool and breathable.

They are also ideal for girls, boys, and toddlers.

If your kids often go for outdoor school activities and have DIY light-duty works, these gripper gloves are no less than a blessing. You won’t worry about weeds or other gardening tool bruises as knit wrist make a perfect fit on hands.

A huge plus point you must not forget is that kids of different age groups can show unity with similar gloves. So, size is not an issue with these gripper gardening gloves. Get what you want!

Sizes available: size 2 (age 3-4), size 3 (age 5-6), size 4 (age 7-8), size 5 (age 9-10), size 6 (age 11-13)

Reasons to BuyReasons to Avoid
Excellent qualityRubber smell
Great gifts
Inexpensive
Snug fit
Broad range of size


Grippy Rubber Coated Kids Gardening Gloves for Age 6-8

If your grandsons love to help you in the garden and cleaning up the woods in your backyard with thorny vines, these gloves are perfect. No thorns would be in their fingers anymore! Best for age 6-8.

Special Features

  • Made of Rubber
  • 3 pairs – Orange, yellow and green
  • Small, medium, and large sizes
  • Cheerful designs
  • True to size for kids
  • Long Cuff
  • Machine washable
  • Breathable and skin-friendly

Buy on Amazon

These cool-looking rubber-coated garden gloves are pure rubber made with no compromise on hand safety. Elastic wrist for easy on and off.

Above all, a long elastic cuff protects your little ones’ wrists and adds to their gardening joy. When there is no slip, kids can effortlessly hold water cans and dig the soil.

Mostly, parents are concerned about kids’ delicate skin as sweating can irritate them. But the good news is these grippy rubber-coated kids gardening gloves are one of the safest gloves you can ever find. No sweating at all.

Kids also have no fatigue working in these gloves as they are lightweight and stretch to accommodate. Even toddlers can give you good company in the garden without any risk.

They are durable with a good grip on the palms and fingers and have nice colors.

Cheerful designs on gloves make them kids’ favorite in their gardening tool bag. They can enjoy indoor plant care, pruning, cutting, and seeding on the lawn.

Sizes available: Small, medium, and large

Reasons to BuyReasons to Avoid
Fit wellNot any!
Durable
Good design
Dark coating to hide dirt
Soft and comfortable


Soft Jersey Kids Garden Gloves

Give your kids gardening comfort with soft jersey garden gloves ideal for ages 5 to 8.

Special Features

  • Cotton material
  • 3 pairs – Green, red and blue
  • Workwear
  • Reusable
  • Comfort fit

Buy on Amazon

If you are looking for funky and lightweight kids gardening gloves at a reasonable price, these are the best picks. 100% pure cotton material makes these gloves super soft and highly comfortable for little helping hands.

These super cute garden gloves do not suffocate hands as they are breathable and let hands aerated.

These are ideal for general purpose use, and knit wrist keeps dirt out of the hands, so kids’ hands stay clean. The flower pattern on green, red and blue gloves make them more eye-catching, and kids just love it.

Most kids want twinning with their mothers in the gardening outfit, so it is a dual treat. You can also find these gloves in the women gardening gloves range.

Sizes available: Kids size

Reasons to BuyReasons to Avoid
Bright spring colorsNot waterproof
Best for light garden workNot sturdy
Breathable
Comfortable
Inexpensive


Children Gardening Gloves with Panda and Smile Face

Kids love happy smiling faces, and these garden gloves for age 2 to 12 make kids cheerful with Panda and Smiley face featured on their gloves.

Special Features

  • Foam, latex coating, polyester back
  • Green and yellow
  • 5 sizes available
  • Durable
  • Comfy

Buy on Amazon

Does your garden have an insect infestation, and kids are fearful of touching the branches? It’s a common garden problem that can undermine young gardeners. But take it as an opportunity and give little gardeners a whole new gardening exposure with these foam latex gardening gloves.

These gloves have polyester back to protect children’s hands from any sting. Kids can also firmly grip anything and remain safe if they accidentally touch a thorny vine.

The polyester material makes these garden gloves long-lasting, and kids can effortlessly perform their projects. Kids can also wear these sturdy garden gloves when going hiking or fishing.

Soft rubber palm keeps little hands working with maximum comfort and flexibility.

You can also gift gardening gloves to your kids on any special occasion or simply encourage their gardening passion.

Sizes available: size 2 (for 2- 4 years), size 3 (for 5-6 years), size 4 (for 7-8 years), size 5 (for 9-10 years), size 6 (for 11, 12 years)

Reasons to BuyReasons to Avoid
Great quality No any!
Fits well
Elastic
High breathability
Broad range of size
Best for toddlers to teenagers


Unicorn Design Toddlers and Kids Gardening Gloves

Give your girls, boys, or toddlers of age 2 to 8 these amazing gardening gloves with unique color patterns and adorable designs.

Special Features

  • Rubber material
  • 3 pairs – Multicolor
  • 3 sizes available
  • Unicorn designs
  • Stretchy
  • Soft

Buy on Amazon

These rubber gardening gloves with foam coating and polyester back are highly durable, and kids favorite gloves. Soft rubber palm also allows easy handling.

The decent color combination makes these gloves pretty, with a long list of their key features. Unicorn gardening gloves are super comfortable with the stretchy seamless liner and perfectly fit tiny hands.

Little girls and boys enjoy yard work in these gloves without dripping hands. The high-quality material makes these gloves highly breathable, and kids feel super lightweight.

3 pairs of gloves allow kids to share one with their friends and enjoy garden playdate together.  So, whatever kids want to do in the garden, have any school project or simply join mother nature, these soft gloves are their first step to be a pro gardener.

Sizes available: size 2 (for 2-4 years), size 3 (for 5, 6 years), size 4 (for 7, 8 years)

Reasons to buyReasons to avoid
Premium quality Not any!
Fit toddlers perfectly
Lightweight
Lovely patterned designs
Perfect gardening gift


Kids Gardening Gloves For Age 2-14

Encourage little gardeners in the yard with full protection and reward with cute gardening gloves best suitable for 2 to 14 years old kids.

Special Features

  • Latex material
  • 2 pairs – Multicolor
  • Latex coated palm
  • Breathable
  • Knit wrist
  • Durable
  • Anti-slip grasp

Buy on Amazon

These latex gardening gloves are highly recommended gloves for their material and outlook. Your kids can join in the backyard and help with cute little hands.

The anti-slip feature of these gloves is for the latex-coated palm that prevents stiffness and keeps hands in a great working position. Kids also do not feel bulky.

The knit writs keep hands free from dust and cuff extra protection.

On the other hand, kids can also wear these gloves to ride a bicycle, play outdoor sports or paint to protect hands from any damage.

Take a bonus! If boys are reluctant to wear girlish gloves with flower patterns, these neutral gloves are the best pick for them.

Sizes available: (age 2-4), (age 3-6), (age 6-9), (age 10-14)

Reasons to BuyReasons to Avoid
SturdyNot waterproof
Super comfortable
Multipurpose
Inexpensive
Best for girls and boys


Dot, Butterfly & Ladybird Print Kids Gardening Gloves

Special Features

  • Cotton material
  • Pink color with dots, butterflies, or ladybirds
  • 3 sizes available
  • Knit wrist
  • Soft
  • Comfortable

Buy on Amazon

Are you looking for an easy-going, vibrant, and comfy gardening glove for your kids? These gardening gloves with dots, butterflies, and ladybirds are true to meet your need. Your kids will enjoy these purely cotton-made gloves.

These gloves ensure ventilation and don’t make little hands soaked. Above all, these gloves are ideal for warmer seasons as kids feel cool and have dry hands.

These pinkish gloves also protect kids’ hands from any dust help in outdoor activities without any mess. Knit wrist ensures gloves are perfectly fit and not fell off.

So, don’t allow kids to deal with plants with bare hands and cover them with full protection. This not only saves their hands but also builds interest in the plantation.

Sizes available: small (age 5-6), medium (age 7-8), large (age 9-10)

Reasons to BuyReasons to Avoid
ColorfulNot stiff
Easy to wearNot waterproof
Ideal for light workout
Nicely patterned
Highly breathable


Kids Genuine Leather Work Gloves

If your kids want a real gardening experience, you must put on these leather gloves as perfect as adult gloves with a huge size range.

Special Features

  • Leather material
  • Brown color
  • Sturdy
  • Waterproof
  • Imported
  • Durable
  • Comfortable

Buy on Amazon

If you are looking for kids’ garden gloves with premium quality without breaking the bank, your research is at the right spot.

The gloves are produced with only premium quality genuine cowhide leather that is soft and flexible enough for those little hands. These are easy to wear and take up the task and last.

Genuine suede cowhide leather protects your little one from cuts and dirt so that they can work by your side just like a grown-up! Kids do not feel the bulkiness around the knuckles or the stiffness when moving their fingers.

They are as soft and flexible as leather gloves possibly can, so no more bulkiness or clumsiness!

Younger kids can also wear for outdoor sports or other light to heavy-duty tasks. Some grown-up people have smaller hands, and they can also benefit from these leather gloves as their shape and outlook are designed to fit all.

Sizes available: medium (age 4-6 years), large (age 7-9)

Reasons to BuyReasons to Avoid
Premium qualityNot any!
Cheap price
Highly durable
Just perfect!
As good as adult gloves


What to Consider for Buying Kids Gardening Gloves?

Gardening gloves are one of the most important gardening accessories, and kids also need to be used for their gardening purposes. But do you know what features count for the best kids gardening gloves? Here are some features you must consider to prevent a wrong purchase.

Design

The design comes first. As it is the first look and kids are quite receptive in this matter, you must not underestimate their desire.

You may get a wide range of gloves, including disposable gloves, cotton made, leather material, foam coated, soft jersey stuff, or sturdy gloves.

Secondly, patterns and colors matter a lot. So, buy a design ideal for the kids’ wish list.

Size

The second most important factor in selecting kids gardening gloves is size. In fact, it is crucial too. It would be of no use to buy extra fit or too boggy gloves. That’s why get measurements of kids’ hands first and find the best size accordingly.

Here is a two-step procedure to get the size of the hand before placing an order for gloves.

Hand Circumference

Take fabric tape and wrap it around the widest part of the hand. The key point is, take measurements of the dominant hand, which means if your kid is right-handed, take the size of the right hand and vice versa.

Now wrap the tape over the top of the hand and across the palm at its widest part. See what circumference size it is and take notes.

Hand Length

After taking wider dimensions, next comes the length of the hand. Broadly open the kid’s hand and place measuring tape on the tip of the middle finger.

Stretch the tape down to the wrist and again record the measurements in inches. Now you have both the dimensions and can easily find the best fit for kids gardening gloves.

Simply check out the dimensions of the selected pair of gloves and make a final purchase. If the ideal size is not available, keep growth margin and select one size looser fitting.

This is a general way to take the size of a hand, and everyone can take measurements with this method.

Comfort

No doubt gardening is all about physical activity, but for kids, comfort comes first. They feel joy working and helping their elders in the garden, so gloves must be highly comfortable.

They must not be too stiff to hurt fingers or bulky. Take lightweight, easy-going gloves that protect cute little hands from dust, mud, or any sharp object.

Durability

Buy gloves with the belief that every penny is worth it. These must not be too fragile to work for a couple of days. The material of gloves should be withstanding and must be nicely made. So, buy durable and long-lasting gloves.

Final Thoughts

Summing up kids gardening gloves research, I have found ‘Soft Safety Rubber Gloves for Kids Gardening‘ best from the rest. You can see the details and specifications of these gloves at the top of the list in this article.

These soft rubber gloves have taken full marks for their highly comfortable features and durability. High elasticity makes on and off easy. Above all, these gloves are inexpensive to buy and are also environment friendly plus CE Certified to reach EU Regulations.

So, you can buy and ensure your kid’s safety in the garden with these amazing gloves.

What to Plant with Broccoli – Detailed Broccoli Companion Plants?

By Sarwat Rehman

Do you know inappropriate broccoli companion plants can make your plant stressed out? They compete with broccoli and suppress the growth.

Broccoli companion plants include leafy vegetables, tuber plants, and aromatic herbs, including mint, chamomile, celery, rosemary, and dill. Some annuals and perennials like Marigolds and Nasturtiums also prove best companions of broccoli. They give several benefits to companions and assist their growth.

So, if you want to keep your broccoli plant flourishing, be wise to surround it with the right plants and get the proper benefit of companion planting. Here you will find the ultimate benefits of all broccoli companion plants and how they encourage broccoli growth.

I’ve divided broccoli companion plants into sections

  • Vegetables
  • Herbs
  • Annuals and perennials

In the end, you will also find bad companions of broccoli. So, let’s explore.

Vegetables – Broccoli Companion Plants

Beets

Beet plant (Beta vulgaris) is a cool-season fast-growing vegetable plant that grows well in cool temperatures of spring and fall 1.

Broccoli companion Plants
Vegetable Broccoli Companions

The beet plant is generally grown as a root crop, but all parts of it are edible. These are one of the most beneficial companion plants for broccoli as they require little room and are compromising.

Beets also enrich soil nutrients and make it healthy for companion planting.  The second most obvious reason for planting beets with broccoli is the calcium need.

Broccoli absorbs an enormous amount of calcium from the soil that does not affect beet growth. In this way, both plants get what they need without any competition and prove good companion plants for each other.

Lettuce

Lettuce (Lactuca sativa) is a well-known leafy vegetable and, like beet plants, is also a cool-season crop. It is grown worldwide, but the USA and Europe are the most significant consumers and producers of lettuce 2.

Growing lettuce with broccoli is in both plants’ best interest and provides grow-able conditions to each other.  You can plant relatively close to each other without worrying about space and nutrients as both plants have root systems at different levels and draw nutrients from different levels of the soil.

So, there is not any stressful situation or unhealthy competition among plants. In fact, lettuce has a fibrous root system that makes roots go deep down in the form of fibers and absorb required nutrients.

There is also a mutual benefit of growing lettuce with beets and broccoli, as lettuce benefits from the magnesium added by the beets.

So, it’s a win-win situation for all plants.Potatoes

Potato plant (Solanum tuberosum), member of the nightshade family Solanaceae is staple food crop of many countries 3.

Potatoes are grown for edible tubers widely used all over the world. You may cut, mash, boil or cook potatoes to have a starch-rich diet. In fact, potato flour is also used as a thickener for sauces in baking.

If you already have potatoes in a garden bed, you must know how easily they grow. But growing potatoes with broccoli is an ultimate treat.

They make broccoli more delicious and mouthwatering by enhancing its flavor.  You can clearly notice the difference between broccoli having potatoes as a neighboring plant and the one growing alone.

Secondly, growing potato plant along with broccoli is also a favor to your potatoes. Broccoli has a shallow root system and doesn’t need in-depth nutrients. On the other hand, potatoes have a deep-rooted system, and roots anchor profound in the soil to absorb nutrients.

So, both plants reasonably get the required nutrients at different levels of the soil without developing competition.

Shallots

Shallots, a variety of onions (Allium cepa), are slightly aromatic plants belonging to Amaryllis 4.

The shallot bulbs are grown for their mild flavor in predominantly Asian cuisines. You can also use shallots in meat recipes and different sauces.

When it comes to broccoli companion plants, shallots stand out for pest repelling capabilities. They repel carrot rust fly and make vegetable garden pest-free.

Similarly, you can pair shallots with other veggies like carrots, beets, and herbs, including sage, thyme, mint, and chamomile.

Radishes

Radish (Raphanus sativus) is a cool-season, fast-growing vegetable belonging to the mustard family. The most common radish varieties are likely of Asia and are grown worldwide 5.

You can eat raw radish roots or cook leaves for a mild crisp.

If grow spring-type radish, they begin in late summer and mature in cooler days of fall. In comparison, winter radishes are sown in mid-summer to late summer and grow considerably more prominent.

A considerable benefit of rowing radish with broccoli is its mild growing behavior. Radishes do not thrive. They mature before other crops and help break up the soil as they grow. This early radish growth breaks down nutrients in the soil take companion plants can take.

You can also interplant broccoli with radish, spinach, and lettuce. These crops enjoy the shade under broccoli during late spring and early summer.

Aromatic Herbs – Broccoli Companion Plants

Broccoli companion Plants
Aromatic Herbs – Broccoli Companions

Celery

Celery (Apium graveolens )is an aromatic herb belonging to the Parsley family 6. It is mainly used as a vegetable but can also be delicately used in stews, stir-fries, soups, and salads 7.

Like so many other herbs, Celery is a potential companion of broccoli. It helps improving broccoli’s flavor and make it more delicious.

Broccoli, celery, potatoes, and onions make a perfect companion garden where all neighboring plants boost broccoli’s taste.

Chamomile

Chamomile (Matricaria chamomilla) is a traditional herb that comes from the daisy-like flower of the Asteraceae family.  It is widely used for various medicinal purposes and is an excellent tea ingredient.

You can have two common types of chamomile, German chamomile and Roman chamomile 8.

Chamomile is a wonder plant with anti-bacterial and anti-fungal properties. The good news is the chamomile neighboring plants also get the benefit of these properties.

When grown chamomile along with broccoli, it would automatically be safe from bacterial and fungal infections.  Mildew, mold, and blight are major fungal ailments, but chamomile serves as a barrier to protect broccoli from such diseases.

It also has a deterring scent and helps getting rid of mosquitos. When it comes to insects, it is not amazing it deterring harmful insects or mosquitos but is known to attract beneficial insects like hoverflies and ladybugs. These beneficial insects consume aphids, mites, or any other plant-eating insects.

Chamomile also attracts bees and other pollinators to the garden.

Overall, chamomile acts as a defense mechanism against bacteria, fungi, and insects to safeguard broccoli and other neighboring plants.

Chamomile also pairs well with mint and basil. It improves their taste and smell. So, growing broccoli with chamomile, mint, and basil is a great way to make your garden versatile.

Rosemary

Rosemary (Rosemarinus officinalis) is a relatively easy-to-grow herb and with ornamental features 9. It grows stunning flowers ranging in blue, white, and pink depending on the rosemary variety.

It has an intense flavor and pine-like smell that makes it a popular ingredient in several foods.

Rosemary is one of the best companion plants of broccoli growing along with other herbs like mint, thyme, oregano, sage, and lavender for its insect repelling power.

Rosemary repels cabbage moths, Mexican bean beetles, carrot rust flies, and cabbage flies that lay their eggs on broccoli. When your plants get rid of damaging insect pets, they grow healthy and beautiful.

Mint

Mint (Genus Mentha ) is a fragrant herb of the Lamiaceae family. This aromatic herb is widely grown and used in herbal medicine.

Mint also adds a unique flavor and pleasant aroma to the salads and cuisines. There are over 25 species of fragrant herbs, including this mint family 10.

Mint is a fantastic broccoli companion plant as it helps to maintain the fertility of the soil. It attracts earthworms, natural soil dwellers to improve soil fertility and helps to establish a uniform nutrient level in the soil.

Similarly, mint attracts hoverflies and predatory wasps and repels flea beetles, aphids, and cabbage moths. You can use cut mint as mulch around broccoli or grow in containers around any vegetable garden.

Dill

Dill (Anethum graveolens), a parsley family member, is an annual or biannual herb with a strong scent 11.

Whether fresh or dried, Dill leaves are used in salads, soups, dips, and many other dishes. The dill seeds are also used as a spice in pickling and enhance the flavor of stews and roasts.

Like any other aromatic herb, the dill plant is one of the best broccoli companion plants for its strong aroma.

It attracts ladybirds, garden spiders, hoverflies, bees, and parasitoid wasps. These beneficial insects or predators make a defense for broccoli and all other plants grown in closed vicinity.

When there would be no pest problem, plants will be healthy.

Annual and Perennial – Broccoli Companion Plants

Broccoli Companions
Flowers – Broccoli Companions

Marigold

Marigolds (genus Tagetes) are warm-season annuals with bright and long-lasting blooms. They are easy to grow and give your garden a spark of bright color 12.

It is believed that marigolds have some pest-repellent properties and keep several pests in check. French Marigolds and Mexican Marigolds are two common types to grow as companions of the broccoli plant.

French Marigolds produce a chemical to repel root rot nematodes, root-lesion nematodes, whitefly, and Mexican bean beetles.

Marigold companion planting also controls potato beetles, corn earworms, flea beetles, Japanese beetles, squash bugs, and cabbage maggots.

Similarly, the Mexican type also deters many pests and discourages rabbits from nibbling their plants 13.

Nasturtiums

Nasturtiums (Tropaeolum majus), native to South America and Central America, is a warm-season, easy-to-grow annual and perennial plant 14. The absolutely gorgeous nasturtiums flowers are a pure delight to the garden or landscape.

Nasturtiums are the most beneficial broccoli companion plants as they act as traps to attract aphids and squash bugs in the vegetable garden.

They keep such bugs away from vegetables and make a pest-free environment. Another outstanding contribution of nasturtiums in companion planting is their power to attract pollinators and hoverflies in the garden.

Broccoli Companion Planting Chart

Plant Varieties  Broccoli Companion Plants  Companion Plantation Benefits
Vegetables Beets Enrich soil nutrients, Absorbs enormous amount of calcium
Lettuce

Draw nutrients from different soil levels, Different root systems, No competition of space and nutrients

Potatoes Enhance broccoli flavor, No competition
Shallots Pest repellents, Repel carrot rust fly
Radishes Breaks down nutrients, Make soil healthy
Vegetables Celery Improves broccoli’s flavor
Chamomile Anti-bacterial and anti-fungal properties, Deterr insects, Attract beneficial insects and pollinators
Rosemary Insect repelling power
Mint Maintain soil fertility, Attracts hoverflies, Repel insects and beetles
Dill Attract pollinators and insect predators, Repel insects
Annuals and perennials Marigolds Produce a chemical to repel insects, Discourages rabbits nibbling the plants
Nasturtiums Acts as insects trap, Lure aphids, Attract pollinators and hoverflies


What not to Plant with Broccoli – Bad Broccoli Companion Plants

When growing broccoli companion plants, avoid other members of the brassica plant family as they prove bad companions in poor soils 15.

Broccoli Companion plants
Bad Broccoli Companions

Plants from the same family have similar nutrient requirements, and in nutrient-deficient soil, plants compete and grow with nutrient deficiencies.

Growing different brassicas is not harmful as plants have a large nutrient reservoir if the soil is nutrient-rich and fertile. Also, be sure to properly fertilize the soil, so the soil remains full of nutrients throughout the growing season.

Here are some plants, including Brassicas that are avoided to plant with broccoli:

  • Kale
  • Cabbage
  • Cauliflower
  • Strawberries
  • Tomatoes
  • Peppers
  • Eggplant
  • Mustard greens
  • Pole beans
  • Lima and snap beans
  • Squash

The other significant category of bad broccoli companions is the heavy-feeders. Broccoli is also a heavy feeder, and other heavy-feeding plants grown in broccoli’s vicinity can negatively affect it.

Instead, pair up broccoli with light-feeders, for example, beets or plants mentioned above in the article.

Here are some heavy feeders you must avoid to grow with broccoli:

  • Watermelon
  • Cantaloupe
  • Pumpkin
  • Sweet corn
  • Asparagus

So, it is all about broccoli companion plants, what to avoid and what to plant with broccoli. Hopefully, now you can better get the benefit of companion plantation and grow multiple plants to enhance the garden diversity.


  • « Previous Page
  • 1
  • 2
  • 3
  • 4
  • 5
  • 6
  • …
  • 10
  • Next Page »

Most Recent

  • How to Store Butternut Squash [to Save Harvest]
  • How Do Indoor Plants Purify Air – Surprising Truth!
  • Do Indoor Plants Need to be by a Window? [Secret Answer]
  • Are Indoor Plants Harmful at Night? Truth behind the Myth
  • How to Grow Butternut Squash in Small Space [3 Methods]
  • About Us
  • Privacy Policy
  • Terms and Conditions

Copyright © 2025 | Privacy Policy | Terms & Conditions|