Gardening Zeal

All About Gardening

  • Home
  • Gardening Guide
    • Growing Fruits
    • Growing Vegetables
    • Lawn Care
    • Plants and Flowers
  • Indoor Gardening
    • Houseplant Types
    • Indoor Plants FAQs

Having Frogs in Garden – Are Frogs in Garden Good or Bad?

By Sarwat Rehman

Gardeners often inquire ‘Are frogs in garden good or bad?‘

As they like bright green creatures but also get worried due to their presence. Likewise, many gardeners just like you are looking for an authentic answer to this question.

Adding to your good luck you are at the right place to get all about differentiation of frog and toad, straight towards your question ‘are frogs in garden good or bad’ and how you can invite them.

Most importantly read about POISONOUS FROGS to encounter if you find them in the garden and stay safe.

Frog vs Toad Difference – Frogs in Garden

If you have a yard or garden with beautiful green, be ready to host frogs and toads!

No need to be worried about your plants as they are not intended to dine your plants instead, they will help to get rid of insects and assist in many ways.

Just keep exploring!

frogs in garden
Frogs vs Toad – Observe the Difference

So, before hosting your guests, frogs and toads, just have a brief overview of their habitat, where they like to live and want to eat.

Frogs and toads are amphibians, which means they need both water and land for their survival.

  • Frogs are aquatic and prefer a moist environment while toads live on land but near water.
  • The skin of frogs is slimy and smooth while toads have dry bumpy skin. These bumps are not going to give you warts.
  • Frogs have a narrow body while the body of toads is wider.
  • Frogs jump high but toads run or take small hops.
  • The eyes of frogs are big round and bulging while toads have small eyes.
  • The lifespan of frogs is generally the same. They usually live for about 7-14 years.
  • The tongue of the frog is quite longer than the toad that is why a frog can capture prey from a long distance but the toad must be near to its prey.

The size of frogs varies are there are many larger frogs that are extinct now.

The largest Frog is the ‘Goliath Frog’ which is 30cm long approximately 13.5in. It weighs almost 3 kilograms.

According to National Geographic, ‘The Devil Frog of Madagascar’ was once entitled largest frog with 41 cm length and 4.5kilogram weight but is extinct now.

The smallest frog is the ‘Gold Frog’ which is approximately 1 cm long and weighs 200 grams (7 ounces).

Frogs in Garden Good or Bad

Is inviting frogs in the garden good or bad? Do you think they can do bad with your garden?

Definitely NO!

But if they are not doing bad are you going to have any benefit?

Obviously Yes!

Rather than a single, they are going to give you a list of benefits to have them in the garden.

Count them down one by one!

  1. Natural Pest Control

Frogs and toads give tremendous pest control services.

In fruit or vegetable garden, insects like flies, mosquitoes, caterpillar, beetles and cockroaches are the main problems not only for plants but also for human beings.

So, frogs serve as a helping hand to get rid of all insects benefiting from harmful disease-carrying mosquitoes, flies and other insects.

As per research, amphibians consume approximately 10,000 insects per summer season.

In this way, all insects vanish without the use of dangerous insecticides or pesticides.

  1. Wildlife Conservation

Amphibians especially toads and frogs are severely facing environmental changes as there is a lack of interest of people to consider such animals.

If you allow local frog and toad varieties to your garden, they will reproduce in a healthy ecosystem.

In this way, their population will increase resulting conservation of wildlife.

  1. Bio indicators

Frogs are exceptionally good bio-indicators. You can indicate something is wrong in your garden.

As frogs inhabit in healthy environment indicating all is well.

But if you see this tiny creature leaving your place, you must locate where is the problem going on.

They might have a problem with water that you have arranged for them might possibly have any chemical spilled in it or you have placed hazardous chemicals openly.

  1. Eco-Friendly – Frogs in Garden are Good!

The environment is facing many problems. If you give amphibians little attention, they will give you huge benefits in return.

When they select your garden to live in, they make it eco-friendly eliminating all risks and hazards.

  1. Frogs Good for Gardens and Gardeners

Most importantly, this little jumping creature singing in its soothing sound gives you a relaxing sensation especially when you are busy with pruning or growing new plants.

They will give you perfect company and never let you bore!

  1. Children’s Recreation

In addition, to give you company, they are a real source of enjoyment for children. They love to see their jumping skills.

Their life cycle from tadpole to a complete frog is mesmerizing.

Children find outdoor activity rather than sticking to games or cartoons that is healthy for them.

Now, hope so your confusion regarding frogs in the garden are solved. This is not the end of all benefits. These are a few from many.

You can experience it on your own and see much more.

Here is the time to make your garden frog friendly.

Let’s do that!

How to Attract Frogs To Your Garden – Make Garden Frog Friendly 

Yes! You can attract frogs to the garden to take many advantages and give them natural habitat to live in.

Let’s see what you can do to invite!

1. Remove Hazardous Chemicals 

As frogs are nature-loving creatures and want a natural ecosystem to survive. So, if you want to attract frogs in the garden you must remove all chemicals from the garden.

Even do not use insecticides, pesticides, herbicides or other chemical fertilizers if you want to attract frogs in your garden.

One of the alternatives to fertilizers is you must follow organic gardening techniques.

Use healthy soil and grow companion plants by considering crop rotation.

Keep all hazardous materials, e.g; repellents saved at the right place, out of access to hoping young frogs.

Caution: An important thing to handle any type of frog or toad is your hands must be rinsed before touching it. 

Amphibians have porous skin like a sponge. If you handle it carelessly without rinsing bug repellent from hands, it will be absorbed into the frog’s porous body and will poison it.

2. Give Them Shelter 

Frogs hide from the sun.

You have to give them a proper shady place to shelter from the scorching heat.

One thing you can do to provide shelter is to line the pond edges with pots or use stones to make a cave-like shelter to hide in.

3. Grow Right Plants

Having frogs in the garden means that you provide the appropriate conditions.

You have to take care of their likes and dislikes.

So, grow plants that are not poisonous to frogs and toads.

If you want to attract frogs in the vegetable garden, you have to avoid eggplant, snow peas and rhubarb in the pond area or any garden vicinity where frogs have access.

In the case of the flower garden, avoid planting daffodils, hydrangea, hyacinth, azalea and honeysuckle.

If you will provide the most appropriate conditions, there will be more frogs and toads in your garden.

Caution: Do not grow Cattail in frog ponds as they are thick-stemmed plants with a high proliferation rate and can crowd pond vegetation. 

Reeds, sedges and spike rushes are the best plants to grow in frog ponds as they are plants with thin stems.

Thin and vertical stemmed plants as mentioned above are the best suitable plants.

4. Make a Water Pond

A watery place is essential to invite frogs to your garden because frogs are amphibians and have slimy porous skin to breathe through it.

They need enough water to maintain their skin moisture and lay eggs.

Caution: You may not encourage frogs and toads to stay if you have dogs that enjoy hunting down toads.

As a defence mechanism against predators, most toads release skin secretions that produce a foul-smelling odour and can be toxic to dogs and other animals.

5. Frogs in Garden but No Pond – Other Water Sources

If you are worried about frogs providing water in the garden but not having a pond, use other alternatives.

A spare shallow basin or cemented pot can give you a place for water storage.

Place these pots in a cool shady place and allow frogs to enjoy!

Are All Frogs Poisonous – Don’t Invite Frogs in Garden Unknowingly 

Before inviting frogs in your garden, you must research and consider whether all frogs are poisonous? Because definitely, you intend to host friendly frogs rather than poisonous ones.

So, here comes the answer to your question ‘Are all frogs poisonous’ that is ‘NO’. All of the frogs are not poisonous.

Some of the species of frogs and toads are poisonous that you must not have in your garden.  

There are more than 4700 species of frogs out of which only about 100 species are poisonous native to tropical and subtropical regions, Africa, Central, and South America. 

Likewise, toads in the garden may also be dangerous but fewer species, about 200.

You must be conscious and observe signs of poisonous frogs before rearing in your garden.

Deadly Poisonous Frog

‘Golden Poison Frog’ (Phylobbates teribilis) is the most poisonous frog on earth that belongs to the genus Phyllobates. 

The most striking feature of the golden poison frog is, an adult frog has enough poison to kill two mature African Bull Elephants.

Poisonous frogs are dangerous enough to prove fatal.

So, be careful in nurturing frogs and toads in the garden.

Telling you about dangerous frogs doesn’t mean that you can not have them in your garden.

You simply need to be careful and pinpoint any dangerous species if you find something mysterious (although wildlife authority keeps strict observation).

How to Tell If a Frog in Garden is Poisonous?

As you know now that some frogs are poisonous but not all, you can point out poisonous ones by observing the signs.  

First of all, appearance defines a poisonous nature.

In the animal world, bright striking color warns you to be alert.

Yes! Poisonous frogs tend to be bright in color but not all bright colored frogs are poisonous. They look like pretty creatures but carefully touch such species as they may injure you.

Invite good frogs in the garden and take care of yourself!

Best Wine Bottle Fountain Ideas – 5 Amazing Fountains to Style Garden

By Sarwat Rehman

Do you have ‘Wine Bottle Fountain’ in your yard? What? You haven’t heard or ever seen bottle fountain?

This is something you really missed!

Know about it and design your yard.

Wine bottle fountain is a DIY fountain that is a unique element of the garden and you can make it easily. Using empty glass, metallic or plastic bottles, you can design a fountain and add required details with decorative materials to make it elegant.

Here is all about how you can make wine bottle fountain with one or multiple bottles, stunning bottle fountain designs and many more ideas.First, you will get things needed and know the detailed procedure of making a DIY wine fountain. Next are 5 amazing ideas, and in the end, you’ll find fountain pump purchase guidelines.

So, don’t make a delay and let’s start exploring this pro guide.

Make Wine Bottle Fountain Easily

Wine bottle fountain is as easy to make as to relax besides it having a cup of hot coffee on a foggy evening.

Many people style gardens with luxurious fountains or waterfalls that are quite common and lack uniqueness.

Wine bottle fountain
Wine Bottle Fountain – How to Make

If you want to style your garden uniquely with no expense, you can do with little creativity.

You just need few things depending upon how much you want to decorate the fountain.

So, go in your storeroom and collect all the empty wine bottles or simply glass bottles to make new out of them.

You can use as many wine bottles as you want to make eye-catching fountain. Simply one bottle can also help to make wine bottle fountain. The rest of the decoration depends on your taste.

So, let us begin our creativity!

Things you need

  • Wine bottles
  • Wine or cocktail glass
  • Fountain pump – Electric or Solar
  • Power supply
  • Basin – Optional
  • Tubing
  • Decoration rocks/ marble or anything you have or want to add in decoration

Wine Bottle Fountain – Project Details

Creating a DIY garden fountain gives wider opportunities to use multiple things in different ways, but the principle is the same. Here you will get basic details of wine bottle fountain and modify it as per your need.

Drilling Glass Holes

Drilling holes in the glass bottles is the first thing before stepping into the garden to make a fountain. It seems to be daunting, but diamond bits make it easier and practical. Diamond bits are glass, granite, or marble cutting tools that effortlessly drill holes in the wine bottles.

So, invert the bottles, and make holes. Use diamond bits gently and go slow without forcing it. Also, keeping the bit wet makes cutting smoother.

Bear in mind diameter of the holes should be equal to the tubing you choose. Wider holes may leak or result in malfunctioning.

Pro Safety Tips

Glass drilling can prove to be risky as cutting heats up glass and possibly crack in your hand. So, wearing gloves is the best approach. Secondly, wear safety glasses to prevent eyes damage.

Pipe Assembling

When bottles are ready and you have decided on the fountain layout, next is the assembly of the pump. It is quite simple.

If you already have a fountain pump, that’s great. But if you want to buy, make sure you have checked electric, and solar-powered fountain pumps available at the end of this article.

So, there would be two pump areas; input and output. The input side would be attached to the water reservoir and ensure it stays clean.  Once it is clogged, the pump power will decrease.

On the other hand, the output side is to supply water to the fountain. You can directly attach it to the wine bottle or use multiple tubing for each bottle. You may either get this fountain tubing with the pump or buy it from any hardware store.

Pro Assembly Tip

If you find the pipe is somewhat loose or holes are larger, use clear silicone sealant to adjust it. You can also use it otherwise to hold the tube firmly.

Add Details to make it Attractive

You are almost done with major DIY wine bottle fountain work. Next is its embellishment. You can use decorative garden stones, rocks, or pebbles. Adding garden statues in DIY fountains shows next-level creativity.

You can also make the fountain more interesting by adding any color to the water. Red is the most favorite and gives a stunning look.

You can also use more than one glass bottle placed in a way that water spills over them or splashes over glasses.

Aditionally, place a deep cemented sink or basin, if you want, to keep the fountain on ground level. Otherwise, you can sink it into the ground, but it should be deep enough to support water flow.

More Ideas of  Bottle Fountain

So, now you are able to make bottle fountain easily on your own by using empty glass bottles or wine glasses.

You can position it at a most visited place or in center as it attracts everyone’s attention.

In addition to this simply easy fountain idea, here are some more ways to decorate the garden with glass bottle fountains.

Just have a look and decide which one you are going to use!

Designing bottle fountain with colored water flowing out and splashing on glasses gives an exclusive fountain look.

1. Center Stand Style

First of all, decide on a centric garden place and design its structure to place bottles and glasses.

It is a detailed fountain with multiple fixtures and stands. You may also need a helping hand to make this arrangement.

If you are not interested and want to keep it budget-friendly, too, minimize the massive stonework and go simple. Using bricks is also an option.

So, make the structure as you want, follow the project details mentioned above, decorate it with marble and rocks to give it an ecstatic look.

wine bottle fountain
Wine Bottle Fountain – Center Garden Idea

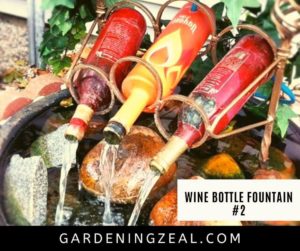
2. Rack Fountain

Furthermore here is another way of using bottles to make a fountain in a rack.

This is a relatively simple and inexpensive garden fountain. All you need is a stand and few empty bottles. If you don’t have a wine bottle, no worries. You can also use plastic or metallic bottles with labels to place in the fountain.

A plus point of this fountain is bottles are appropriately held in the frame and can not fall.

One more way of using bottles to make a fountain.
Flowing Fountain Idea

This is the best creative fountain you can ever have!

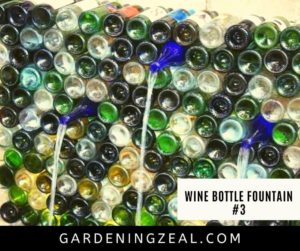
3. Waterfall Wall Wine Fountain

If you don’t have empty bottles right now, start collecting and make this fountain at the front that will give your garden wall a great running water look.

Stack all the empty bottles in a corner with

In this style, you don’t need to drill holes in all bottles. Instead, decide how much fountain water flow you want. Maximize or minimize as per your wish and make holes in desired bottles.

Stack them all at your desired place and hold firmly with any sealant or sassing to prevent bottle slip. Next, take a basin, fountain pump, and do the same to make this fountain.

bottle fountain
Multiple Bottles Fountain – Water Fall Wall

4. Barrel Fountain

Here is the simply elegant use of wine bottles to make a fountain. Just take a barrel and drill holes by measuring the diameter of the bottles you are going to use.

Adjust bottles in barrel. Give them supply and finally enjoy your creativity!

You can also bring character to this idea and add flowers or leaves to the water-filled barrel.

wine bottle fountain
Bottle Fountain  Idea- Barrel Fountain

5. Center Stone Style

You can make a totally different fountain at a garden corner by placing a big stone beside the bottle and decorate it with stones.

If you have a big stone and don’t sure how to utilize it, it is the best way. In fact, you can also buy this extra-large garden stone to make this fountain.

Certainly, the falling water will give you a relaxing sound.

wine bottle fountain
Center Glass Fountain

DIY Fountain Pumps – Purchase Guide

Fountain pumps come in a wide range of varieties, and each seems to be good on first look. But this is not the case. You must carefully research their types and see what good water pump must-have.

So, you can find this all in the subsequent headings.

Submersible VS External Water Pumps

Generally, fountain pumps are of two types, Submersible, and External water pumps. As the name suggests, submersible pumps can be used in a moist environment without affecting performance. But external pumps’ motors must not come in contact with water.

Some other differences between Submersible and External water pumps are:

Submersible Water PumpExternal Water Pump
Submerged in water Needs dry spot
Easy to installDifficult to install
50 to 5,000 gallons of water per hourHandle 1,000 gallons of water per hour
Low maintenance More maintenance - Moisture risk
No noise Noisier
Consumes less energy Consumes more energy
Cheap Expensive

So, preferably, buy a submersible water pump for a DIY garden fountain and use it without being worried about water contact and electricity consumption.

Here, you can find the best fountain pumps with excellent qualities:

Image Product Details   Pricing
backpac 5ft Power Cord Submersible Water Pump Flow Rate: 800 GPH (3000L/H)
Lift Height: up to 10 ft.
Power: 24W
Voltage: 110-120V
Check Price
backpac 6.5ft Power Cord Submersible Water Pump Flow Rate: 400 GPH (1500L/H)
Lift Height: 
6.56ft/2m
Power:
25W 
Voltage: 110 V-120V/50-60Hz
Check Price
cordlessblower 5.9FT Power Cord Submersible Water Pump Flow Rate: 550 GPH (2000L/H)
Lift Height: 7.2 Ft (2.2m)
Power: 30W
Voltage: 110-120V
Check Price


Solar Powered Water Pumps

These pumps utilize sun – solar energy to flow water in the fountains. Solar-powered water pumps give a considerable advantage of no electricity cost with easy to install features. They are also inexpensive and require low maintenance.

There are batteries with solar pumps to make the process smoother and store excess power received during the day.

When the sun hardly arises on cloudy or rainy days, these batteries help to work in such conditions. Although it is for a limited time, still incredibly assist in low days. You can also supply solar power to the bird feeders.

Above all, a single investment for buying a solar water pump gives comfort forever, and you forget the electricity bill.

Here you can find multi-featured solar-powered water pumps:

Image Product Details   Price
backpac Solar Powered Fountain Pump Features: 6 different nozzles
Nozzle base and head
Spray height: Can reach 30-50cm
Check Price
backpac Solar Fountain Water Pump Features: 7 nozzles
Solar panel with pump
Anti-collision pole
Fastener
Spray Height: 12-20 inch
Check Price
cordlessblower Solar Bird Bath Fountain with Panel Features: High-quality rotor
Service life: up to 10,000 hr.
IP65 waterproof design
Withstand all kinds of severe weather
Spray Height: 45-65cm
Check Price

To make something stunning out of crap is worth applauding. When you put all of your efforts to make new things that people gaze is your silent triumph.

So, don’t hesitate and make the best use of empty bottles to design a wine bottle fountain. It is not only cheap but helps to contribute and to spend time in the garden. Before starting, make sure to use the best fountain pump to keep it running all the time.

You just need to think differently and create wisely.

Yes, make something that matters!

Otto Luyken Laurel – How to Care Otto Luyken Cherry Laurel?

By Sarwat Rehman

The Dwarf Cherry Laurel ‘Otto Luyken’ is an attractive evergreen shrub with lush bloom clusters. This plant is tough and hardy and extremely easy to grow.

This compact Cherry Laurel was granted the prestigious Award of Garden Merit by the Royal Horticultural Society.

Noteworthy Characteristics

Otto Luyken Laurel, a perfect evergreen shrub is a dwarf form of English Cherry Laurel with creamy white flowers on bright glossy foliage.

It was first introduced in Germany by Hesse Nurseries in year around 1968. Originally, it is native to Southeast Europe and Southwestern Asia, generally recognized for the tall growth of plants in the wild reaching tree height.

This broad spreading Otto Luyken Laurel with fragrant spiked flower is a year-round interest that can grow up to 12 feet if unclipped.

You can also grow it quite easily as it is a neat and manageable shrub causing not much disturbance for growers as well as neighbouring plants.

This dense hedge gives compact growth for the privacy screens and is a perfect winter shelter for roaming birds.

Yes, Bird-friendly Laurel, it is!

Hardiness

This fast-growing cherry laurel is adapted to grow from west to south and East of America spreading all the way as it is hardy in zones 6 – 9 and can from partial shade to full sun.

Zone 6 hardiness signifies that it can grow in cold temperatures ranging from 0 – 100 C giving you the opportunity to enjoy its beauty year-round.

Otto Luyken Cherry Laurel – How to Care

Be sure to choose the right location and conditions for your Otto Luyken Cherry Laurel to thrive. Spring and fall are ideal times to plant. Although anytime temps are not extreme you can plant this dwarf shrub. This Cherry Laurel grows in planting zones 6-9.

Plant in full sun to partial shade. In growing zones 8 and 9, some shade is recommended.

Laurels are adaptable but prefer moist, well-draining soil. Water deeply when planting and twice weekly for the first 3 months while your new plant is establishing. After establishing, Laurels are drought tolerant.

Three inches of mulch is a great option to prevent weeds, keep the soil cool and moist, and protect the roots during extreme temperatures.

Fertilize when planting and in spring with a balanced, slow-release fertilizer. We have our own custom blend made to give your new plants the best start! English Laurels can tolerate heavy pruning, but don’t require it. Prune any time of the year.

Otto Luyken Cherry Laurel are a pest, deer, and disease resistant. This Laurel is also pollution and salt tolerant.


When and How to Harvest Kale Plant – Kale Harvesting Guide

By Sarwat Rehman

Are you thinking about “How to harvest kale” that you have grown in the yard and now want to have on your platter?

No need to be worried if you have not found the right way of harvesting kale because this ultimate guide on ‘When and how to harvest kale plant’ will open up all the knots in your mind regarding kale harvesting.

Let’s dig in!

Know About Kale Plant

Green leafy Kale, a member of the cabbage family is must grow green in the garden because of its nature of growth and nutritional significance.

Rich source of carbohydrates and protein, green kale is cool season green capable of tolerating frost.

Instead, leafy green vegetable demands frost as frost adds sweetness to its flavor.

Due to its high nutritional content, kale is been widely used in cooking and even used uncooked as salad or in garnishing.

how to harvest kale
All About Kale Plant

Kale Plant Guide – When and How to Harvest Kale

Most cold tolerant brassicas, Kale is the plant that demands frost feast!

It requires frost for better flavor development that you can also compare by dinning kale leaves before after frost.

You will clearly observe the difference in taste.

  • Sow Right

In order to harvest bulk leaves in fall or winter, you have to sow the seeds rightly so that you can grow rightly.

Sow the seeds about ½ inch deep in the seedbed in rows almost 6 inches apart. Water the seeds on time and take good care of the seedbed to have good results.

  • Grow Right

If you have sown seeds at times inappropriate conditions, you are going to have fresh kale leaves soon.

When you see three to four leaves growing, transfer the plants to their growing position in such a way that the lowest leaves are set at ground level.

Water well. Keep a pace among plants almost 20 inches apart.

By giving water timely and proving feed in spring plants will give the best growth.

When to Harvest Kale – Harvesting Kale

If you have grown kale and now worrying about when to harvest kale, you must be glad to know that it is a winter-loving plant and gives the best sweet flavor if harvest after frost.

It grows best in spring or fall depending upon the time you planted.

Kale planted in late summer will be ready till early fall, while if you plant in winter or spring you will get till late spring or early summer.

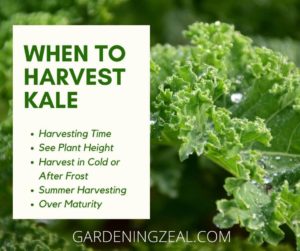
  • Harvesting Time

Mainly, harvesting time depends on your plan to grow kale. If you grow plants from seeds, you can harvest about 2.5 months after planting.

But if you are going to transplant you can expect to harvest after 50 – 55 days of planting.

  • See Plant Height

If you want to pick leaves with full taste, wait to reach plant height up to 8 inches so that they can reach the size of a hand.

Give water timely and harvest regularly to grow leaves even for months.

  • Harvest in Cold or After Frost

Kale can grow in the cold where the temperature is about 80 Fahrenheit. It can also survive frost!

Normally it is said for plants to harvest before frost, but exceptionally kale is one of few plants that not only survive cold but also requires frost for more flavor.

Frost adds more sugar and sweet taste to leaves.

Suggestions to embrace frost

  1. Transplant seedlings about 6 weeks before frost, or grow by sowing for about three months before expected frost so that you can harvest after full flavor is added.
  2. You can also harvest some of the leaves before you expect frost in your area and wait for new leaves to embrace frost.

Generally, kale survives cold, but if you live in an area where the temperature falls down to 32 Fahrenheit, you need to protect the kale plant by insulating with covers or frames.

By doing this your plant will be safe from harsh cold and grow steadily.

how to harvest kale
When to Harvest Kale – Kale Harvesting Time Guide
  • Summer Harvesting – When to Harvest Kale

As kale is a frost loving plant and usually doesn’t like the heat of summer. Leaves get tough and bitter in hot when the temperature reaches 80 or more.

It shows if you plant kale in spring, by the end of summer you will feel leaves with a bitter flavour.

So, if you want sweet tasty kale leaves to enjoy fresh salad in fall or winter you need to harvest almost one-third of leaves in summer.

You can add harvested leaves to compost.

New sweet leaves will develop till winter for your fresh food.

  • Over Maturity

Grow kale as it is a widely and rapidly growing plant but in order to use its leaves keep noticing its maturation level.

It can spread several feet wide and up to 2 to several feet tall depending upon variety.

If you see flower buds or stalks, it means it is over matured. Its over-maturation causes a bitter taste in leaves that is inappropriate for use and devalues them.

In order to delay over-maturity, cut down the floral stalks before blooming. But you still need to harvest at a time before delaying as it can spoil your taste.

How Do You Harvest Kale – Are You Doing Right?

Harvesting kale in the right way is as essential as the life of a plant!

There is always a right and a wrong way of anything, so is the way of harvesting kale leaves that if you properly pick, your plant will grow continuously without any problem.

But if you pick leaves unknowingly, it may cause trouble for your kale.

So, before harvesting this season, must read given right ways of harvesting kale so that it will not die and grow continuously.

how to harvest kale
Are You Harvesting Kale Right?

How to Harvest Kale So It Keeps Growing – Step by Step

A well-concerned question ‘How to Harvest Kale’ is worth questioning because of the strategy you must follow to harvest kale.

Although it’s tricky not a big deal, you just take care in picking so that rest of the plant leaves remain intact.

  • Moving on towards harvesting leaves, you have to take a sharp knife or a pair of pruning shears according to availability, and a jar to put all the leaves in it.
  • When you are done with it, hold the leaves with one hand and cut from the stem in the way you cut the entire leaf.
  • Keep in mind that you have to take old and large leaves.
  • Older leaves grow towards the outer side while the inner top side contains fresh tenders that you must not damage or cut.
  • If you see any damaged leaves showing holes or getting pale, cut them and add them to the compost heap.
  • Kale plant leaves need to be harvested routinely. If you will leave on plants, they will be somewhat bitter and tough.
  • This green leafy plant suggests picking earlier rather than late!
  • Always cut outer leaves that are at the bottom without damaging baby kale leaves. Never cut central bud as it is the growing area of the plant.
  • Do not pick too many leaves from a single plant at a time as it will affect its growth rate. Try to leave about 1/3 of the leaves intact.

So, after knowing simply easy tricks, you can practice on your own to pick kale leaves from your garden.

Things You Must Consider When Harvesting Kale from Your Garden

You must keep an important thing in mind that it takes almost 5 -7 days to develop new leaves from the kale plant, so leave some new central leaves so that plant remains productive.

Grow 4-5 kale plants, that you can easily in pots if lack room in the garden so that you can take a handful of leaves from each plant to enjoy an all-time fresh salad.

Do not cut from roots while harvesting leaves because as leaves grow on stem. If you cut from roots, you are pushing your plant to death.

Kale Plant Dying – Pick Whole

If your plant is grown enough and goes to seed or the temperature has fallen below its tolerance level (below 20oC), it may die.

Before its death, you should harvest all of its leaves and pick the whole plant by cutting from the stalk. Cut the plant stalk near the soil.

You can use these leaves immediately or store them properly for later use as guided below.

Storing Harvested Kale Leaves – How to Store Kale Leaves?

When you are done with all harvesting of kale leaves considering the weather and all other factors, you can store them in the right way to use even after weeks.

Take your leaves filled jar to sink and wash thoroughly to remove any dirt or debris. As plants are susceptible to various pests and sometimes, you spray plants to prevent diseases.

Washing with tap water before saving will free from health concerns.

Tip: Never use hot water or soak the leaves as it causes wilting.

Spread the leaves over a clean and dry place or on a paper towel and air dry before packing.

Tip: Don’t store wet leaves as fungus can grow in moisture.

how to harvest kale
How to Store Kale – Kale Storing Tips

Take a plastic ziploc or resealable bag and place leaves. You can also place a paper towel under leaves for better protection.

Tip: Remove air properly before sealing.

Label the bag with the date you are storing it so that you can use it accordingly without forgetting when you stored it.

Place in refrigerator.

Tip: One to two or three weeks are ideal to store kale leaves fresh.

How to Store Kale Without Plastic?

Storing food; vegetables and fruits, without plastic bags is the main concern in the emerging world.

It is beneficial not only for food but is a SIGNIFICANT NEED to overcome climate change, a devastating reason of which is excessive use of plastics.

Thanx to the plastic alternative storage options like; organic cotton bags, mesh bags although use for groceries, French terry bags are recommended ones to store leafy greens in these plastic-free bags.

You can also store in

  • Glass containers
  • Tea towels

What you have to do is

Properly wash and completely dry the leaves with a paper towel as guided above.

Removing any moisture is essential to prevent rotting so, try to dry maximum.

Remove the stems.

  1. Wrap the hardy green kale in a paper towel loosely, place it in a glass container and store it in the fridge.
  2. You can also place kale veg simply in a cup of water just like a bouquet in the fridge but not in a crowded place.
  3. You can also freeze your green! To freeze, just blanch the leaves after removing the stem and thoroughly washing.

Boil for 25 – 30 seconds and give them heat shock by transferring to an icebox. It will give them crisp rather than wilting.

After doing this, stain all of the water and tap with a towel to dry them out.

Wrap in a beeswax wrap and freeze for later use.

So, hopefully, all of your puzzling questions and tied knots about ‘When and how to harvest kale plant’ are solved.

Now you are in a position to harvest leaves when you see grown with critical analysis and after determining all aspects of harvesting that not only you can use immediately but store for later foods.

Now you can have a green leafy platter when you want!

Do You Know When to Harvest Butternut Squash – 4 Clear Signs of Mature Butternut Squash

By Sarwat Rehman

When fall approaches, gardeners start wondering “When to Harvest Butternut squash” in a way that it could be stored without damage.

Growing butternut squash and harvesting it at right time is the prime thing a gardener must keep an eye on.

when to harvest butternut squash
Butternut Squash – A Delicious Garden Vegetable

As most of the growers mistakenly harvest butternut squash improperly at the wrong time. As a result, most butternuts are not in a condition of prolonged storage and face problems.

Now take a deep breath as it’s time to harvest butternut squash wisely!

You just have to follow prescribed harvesting time and observe 4 simple signs of mature butternuts to harvest timely by working on tips so that you can cure and store butternuts properly.

What is Butternut Squash

Butternut squash (Cucurbita moschata) commonly known as ”Garma or Butternut Pumpkin” is a variety of winter squash that grows on the vine.

Oval-shaped squash with yellow outer hard skin contains yellowish-orange fleshy pulp.

Seeds are present in bell-bottom compartments that are of no use in cooking but can be dried for other purposes.

Rich source of minerals, fiber, antioxidants, and vitamins especially vitamin A, this squash is basically a fruit but is also cooked as a vegetable.

Adding full flavors to winter recipes, butternut squash is full of sweet nutty flavor that you can enjoy till spring.

Tough and firm-textured skin with hard rind makes it capable of long term storage.

Store in winter; enjoy till spring!

When to Harvest Butternut Squash – Know Best Harvesting time

Having fresh food especially vegetables in the home garden is one of the healthiest things you can ever have.

Among kitchen garden vegetables, butternut squash is the most easily grown vegetable that you can grow in bulk and store for later refreshment.

Buy Squash Recipes eBook Here

If you have grown butternut squash in summer it is the best time, October to November, to harvest mature butternuts.

Like pumpkins or gourds, butternuts are grown in spring or summer.

Hot summer weather is the best time to flourish butternut vine and it takes 3-4 months to fully mature.

They will be fully matured till winter.

But, whether the specific squash you are going to harvest is mature enough to be harvested?

You must observe the following signs of matured squash.

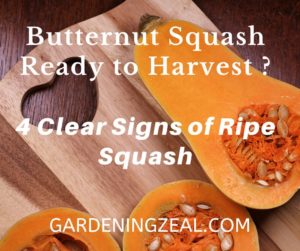
Is Your Butternut Squash Ready to Harvest – 4 clear Signs of Mature Squash

If you have grown winter squash and now planning to harvest, wait!

Wait and see whether your butternut squash is ripe enough to be harvested?

If you harvest before it is fully mature, that will neither be firm nor appropriate for storage and if wait for so long without knowing ripens signs, it will split.

But no need to be worried about it!

You just have to follow and observe given clear signs of ripe butternuts and you will get all of your answers about ‘When to harvest butternut squash’ clearly.

  1. Notice its Appearance

First of all, notice its color. Ripe squash is deep tan (peanut color) with no or minimum stripes near the stem.

When butternut squash grows on a vine, it contains green vertical lines that fade as it matures.

See your vine.

If squashes are still green with lines, wait for a week or two and harvest when you clearly see its matured form.

harvest butternut squash
Butternut Squash Harvesting Time!

  1. Length

Coming to the next sign, you have to notice its length.

Generally, squash matures when reaching 8 – 10 inches but it is not a fact and depend upon variety and soil.

Long squashes grow in nutrient-rich soil. So, carefully observe length on a daily basis and when you see it stops growing, pick your sharp knife and cut from the stem.

  1. Observe stem

A good way to decide whether butternut squash is ready to be harvested is to observe its stem. Brown cracky stem is an indication of its maturity.

As it matures, the plant slowly stops transferring nutrients to winter squash and the stem dries changing color from green to brown.

If you mark this sign OK, you can pick and have delicious squash soup!

  1. Toughness

Finally, you are near to pick your butter squash if it is firm enough to resist being punctured with your fingernail.

The toughness of rind will tell that they are ready to be picked.

Concludingly, harvesting squash tests all of your senses, you need a long, tan-coloured firm rind butternut squash with a brown stem to cut for best taste.

Things You Must Consider When Harvesting Butternut Squash  – Best Harvesting Tips

If you have marked all the signs OK to pick the squash, it’s good.

Now you have to consider some of the very simple tips before harvesting butternut squash. By following these tips, your butternut squashes are never going to be wasted.

  1. Harvesting mature squash at right time will give you the best-storing butternuts.
  2. Use sharp shears to cut rather than pulling from the vine.
  3. Cut from at least 2 inches of the tan cracky stem of butternut. In this way, squash pulp will be protected from bacteria and fungi.
  4. If you are expecting frost in your zone, try to harvest a day or two before frost starts. Severe cold weather or frost can be worst for your squash.
  5. If butternuts are not ripe and frost hits, carefully cover your squash with a sheet or blanket.
  6. Use improperly harvested squash (without stem or with naked pulp) as soon as possible and not store for long. They are more susceptible to bacterial attacks.

How to Cut Butternut Squash Easily

Cutting butternut squash is simply as easy as eating a squash dish!

Yes, this is so simple to cut butternut squash by cutting with a sharp knife or pruners at a distance from rind without damaging it.

As mentioned in harvesting tips, cut 2-3 inches of stem attached with squash to avoid any damage.

If butternuts have accidental cuts or bruises, you can not store them for longer storage. You have to use them early to prevent any infectious attack.

Or you can also add those damaged squash to compost heap so that you can see new growth next year.

How to Store Butternut Squash

Storing butternut squash is important as they are produced in bulk and due to their bigger size can not be used all at once.

Therefore, you have to store them rightly for later use.

Here is a simple way of storing cut or uncut squash. Just follow carefully to store butternut squash.

1. Store Uncut or Undamaged Squash

Storing winter squash carefully is important and need to be done with care.

Don’t place them outdoor or in the refrigerator to be attacked by insects and rot, respectively.

As butternut squash with firm rind is picked for best storing so, do not place them in the refrigerator if you want to store for months (you can store for up to 5-6 months).

By placing in the refrigerator, they will absorb moisture and lose toughness as a result there will be more chances of rot.

Place your butternuts in a dry cool place where the temperature ranges from 50 – 60 Fahrenheit (10 – 150C) and humidity 60 – 70 %.

A dry room or basement is best to store squash.

when to harvest butternut squash
Cure before Store Butternut Squash

Butternuts can also last for 10 -14 days at room temperature placed at the table or a shelf.

For prolonged storage, it is recommended to store in a single layer without piling it up so that they do not touch each other and damage.

Have a weekly check on stored butternuts and observe if anyone showing signs of rot.

2. Store Cut Squash

If you want to store squash in cuttings, you can place it in the refrigerator by cutting it into small to medium-sized pieces.

Just peel off tough skin with a peeler, you can also cut it from the center for ease. Remove inner side seeds with a spoon or scratch with a knife.

Cut it in the required size or for the purpose you want to store.

If you want to roast, later on, cut in cubes, or for noodles use a spiralizer to shred.

Curing Butternut Squash

Curing is the simple procedure done with some fruits and vegetables to maximize their taste and to enhance their shelf life.

Most of the time harvested butternut squash also need curing for best peak flavor and sweetness.

To cure butternut squash, you simply have to place them in a sunny corner of your yard and place them for almost a week.

It will not only enhance their taste but also thicken their skin for prolonged storage.

By placing in a warmer place for some time also removes water that helps to store for a longer time period.

In frost conditions, you can also give curing time in greenhouse.

Coming to end, hopefully, you have gotten all of your questions answered starting from ‘when to harvest butternut squash’ to curing butternuts by following harvesting time and tips to storing conditions.

Now you can easily harvest your squash and store it properly to enjoy delicious squash recipes when you want!

  • « Previous Page
  • 1
  • …
  • 5
  • 6
  • 7
  • 8
  • 9
  • 10
  • Next Page »

Most Recent

  • How to Store Butternut Squash [to Save Harvest]
  • How Do Indoor Plants Purify Air – Surprising Truth!
  • Do Indoor Plants Need to be by a Window? [Secret Answer]
  • Are Indoor Plants Harmful at Night? Truth behind the Myth
  • How to Grow Butternut Squash in Small Space [3 Methods]
  • About Us
  • Privacy Policy
  • Terms and Conditions

Copyright © 2025 | Privacy Policy | Terms & Conditions|